Wednesday, December 25, 2019

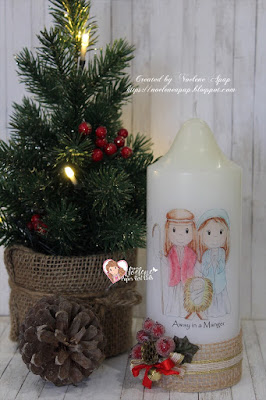
Nativity

Hello everyone, Yay it's my favourite day of the year!!! Merry Christmas!
 I am sneaking in today for this short post, to share with you my latest D.T creation for Paper Nest Dolls using the beautiful image Nativity


I was raised in a Christian household so I thought it was fitting to use this image today being the day we celebrate our Saviors birth. Christmas is always a busy time for us starting with Christmas mass on Christmas Eve followed by family coming over for lunch on Christmas Day. It's always an early start at 5am preparing & cooking. My house is always crazy but I wouldn't have it any other way! Later in the day we usually go outside & have some fun with the kids be it water fights (as it's Summer here in Australia) or some other fun activity. Do you celebrate Christmas? If so how do you celebrate in your part of the world?


I coloured the image with Copics then I transferred the image onto my candle. I used Burlap, Ribbon & Flowers to decorate around the candle.


This adorable image is available in rubber which can be found here .


Supplies:
Stamp: Paper Nest Dolls "Nativity"
Colouring Medium: Copics
Accessories: Pillar Candle, Tissue Paper, Wax Paper, WOC Flowers, Ribbon & Burlap from my stash.

Warning: Please remove any flammable embellishments as the flame burns down. Never leave a burning candle unattended.


Well I better get back to my kitchen! :) 


Wishing you all a safe & blessed Christmas from my home to yours!


Thanks for stopping by!

Hugs

Wednesday, December 11, 2019

Christmas Treat Bags

Hello, today I am back sharing another project for The Paper Nest Dolls. For my inspiration today I have used The Paper Nest Dolls Candy Cane PrincessGingerbread Girl & Mrs Claus to make these super cute & super easy treat bags.


Earlier this month I was in the grocery store & saw some Christmas limited edition Lindor Lindt mint & gingerbread flavoured chocolate balls.  I saw the pretty cellophane wrap that they were wrapped in & instantly I was inspired to use them for my next project, not to mention I am a chocoholic ;) 


I decided to make some Christmas themed gusseted treat bags. These were super easy & fun to make. To start you will need some clear gusseted bags with a wider base. I purchased mine from a cake decorating supply shop. 


My bags were 4" W x 7 1/4" H. Cut your cardstock of choice 10 3/4" x 3 7/8". I made mine 1/8" shorter in width so that the cardstock easily slides into bag. With my gingerbread man cardstock I also had to cut it slightly longer about 1/8" in Length more than the others as I did not want any gingerbread men with chopped heads, so make sure you keep that in mind when you pick your cardstock. Then score at 1 1/4", 7 1/2" & 9 1/2".


Then gently slide your cardstock into the gusseted bag continuously holding end & making sure to press the 2" fold flat at base. 


I then used some shredded tissue paper on the bottom before I filled with treats. Not only does it look pretty but this helps to keep the bag firm as well. 


I then folded the top flap outside of the bag on front & secured it in place using wooden pegs. A metal clip would work as well. Remember a little while back I discovered Sculpey Clay? Well I told you I was going to get addicted to this stuff! I didn't have the embellishments I needed so I made a candy cane & holly. Too Easy!!! I then stuck on my images using double sided foam tape & embellished the pegs! 


  Candy Cane Princess is available in rubber which can be found here & in digital format which can be found here. Gingerbread Girl is available in rubber which can be found here & in digital format which can be found here. Mrs Claus is available in digital format which can be found here.

Don't forget you still have time to join in the fun with the Digi Doodles & Paper Nest Dolls Holiday Blog Hop Collaboration #CraftyFriends for your chance to win in the GIVEAWAYS, CHALLENGE & HUGE SALE! You can find the main post with all the details here.


Supplies:
Paper: Doodlebug Design - Christmas Magic Collection
Colouring Medium: Copics
Accessories: Sculpey Clay for Holly & Candy Cane Embellishment, Spellbinders Dies Scalloped Standard Circles, Shredded White Tissue Paper, Gusseted Bags, Wooden Pegs, Gingerbread Button & Ribbon  from my stash.


Thanks for stopping by!


Hugs


Digi Doodle Studios & Paper Nest Dolls Holiday Blog Hop Collaboration #CraftyFriends

Hello Crafty Friends, 
Who is excited for Christmas? Eek it is only just over 2 weeks away! Are you like me, you always mean to make your Christmas cards early, but somehow you seem to leave them to the last minute?
Let us help you with some darling inspiration from two amazing companies! The digital stamps at Paper Nest Dolls and Digi Doodle Studios are PERFECT for those last minute cards because there is NO shipping involved! Digi Doodle Studios and Paper Nest Dolls have teamed up for the FIRST time for a fabulous Holiday Hop! Head to each blog and subscribe!

Collaborations are a great way to see incredible projects from two different design teams and get your creativity mojo going. Hop along for new ideas on how to combine our two companies' darling stamps. There are GIVEAWAYS, SALES, and a CHALLENGE.

Make sure you keep reading till the end of this post for more information.


For my card today I have used the 2 adorable images, Paper Nest Dolls "Santa Ellie with Gift" & "Rattata's Gifts".


I have coloured my images using copics. I wanted to create a soft look so I used light pinks, light purples & white embellishments & die cuts.


I think these 2 cuties work wonderful together & make a wonderful collaboration! Don't you?


Supplies:
Stamp: Paper Nest Dolls "Santa Ellie with Gift" Digi Doodle Studios "Rattata's Gifts"
Paper: Magnolia Ink - Winter Wonderland
Colouring Medium: Copics
Accessories: Magnolia Doohickeys Dies Tilda Tag, Go Kreate Dies Square Frame Frilly #5, La La Land Die Santa Sleigh, Spellbinders APG Charming Snowflake Doily Die, Martha Stewart Branch Punch,  WOC Flower, Lace & Seam Binding from my stash.


Now for the details on how to win some awesome prizes on Giveaway, Challenge & Huge Sales!!!


BLOG HOP & GIVEAWAYS:

Hop to each blog and see how our Design Teams combined Digi Doodle Studios and Paper Nest Dolls digital stamps on their cards. Be sure to make a UNIQUE comment on each stop on the hop for your chance to win one of three prizes:
  • Grand Prize: $50 Prize Pack including $25 worth of Stamps, Paper Pads and Goodies from Paper Nest Dolls & $25 Gift Certificate to Digi Doodle Studios
  • 2 x winners; 2 DDS Stamps & 2 PND Stamps of your choice 
Commenting will be open from December 10th- December 18th. Winners announced on December 20th.

HUGE SALES: 
  • December 10th-18th Use Code: dolls25
  • December 10th-18th Use Code: DDSHLDYHOP19

CHALLENGE:

We want to see how you COMBINE DDS and PND images! 
Enter your card into the "DDS PND #CraftyFriends" Albums. You can enter your cards in both albums so you will have two chances to win! Each page will have a WINNER!
Prizes: 1 DDS and 1 PND Digital Stamp of your choice. 
Entries will be accepted through December 18th and winner will be announced on December 20th.


You should have come from the AMAZING Dawn's Blog HERE 


Next up on the hop is the AWESOME Fikreta!


If you get lost, head to the main post HERE 

 HOLIDAY HOP:
 Noelene Apap You are here :)


I hope you have enjoyed my inspiration today!

Thanks for stopping by!

Hugs


Monday, November 25, 2019

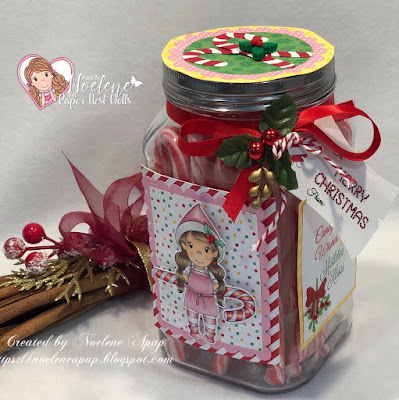
Elf Avery with Candy Cane & Mini Elf Candy Cane Jar

Hello, the Christmas countdown has officially begun! It's only 1 month till Christmas & the kids are getting excited. The house is decorated & Christmas carols are playing everywhere. I just love this time of the year. It's a busy time but with so many family & friends gatherings, it's always one where many memories are made.


As much as I love decorating the house & making it all so Christmassy I also love to make Christmas projects. Ones you can give away as gifts.


For today's Paper Nest Dolls D.T inspiration I used a mason jar & decorated it into a Candy Cane jar. 


On one side I have used The Paper Nest Dolls Elf Avery with Candy Cane.


On the other I used The Paper Nest Dolls Mini Elf. I also used various dies & embellishments to decorate the lid & sides.


Both these fun Christmas images which can be found here & here.

I hope you have enjoyed your visit today. Be sure to come back to visit soon as I have some exciting news! 

Supplies:
Paper: Doodlebug Design - Christmas Magic Collection
Colouring Medium: Copics
Accessories: Sculpey Clay for Holly embellishment, Spellbinders Dies Peppermint Stick, Gingerbread House, Scalloped Rectangles, Scalloped Squares, Magnolia Doohickey Dies Tildas Tag,  Sentiments computer generated, Minc Foil, Ribbon & Twine from my stash.


Thanks for stopping by!


Hugs


Friday, November 15, 2019

Yeti with Tree

Hello today I'm back sharing a card for The Paper Nest Dolls. For my inspiration card today I am using am image from the new Yeti Collection. The image I have chosen is called Yeti with Tree.


I have coloured him with Copics & decided to create a snowy scene.  I just love how it turned out!


I added the snow using a white sharpie paint pen! Then added flowers & lots of snowflake cutouts to decorate.


This cute Yeti & other images like him are available in digi format here.

Supplies:
Stamp: Paper Nest Dolls "Yeti with Tree", LOTV "Christmas Grungy Messages"
Paper: Pion Design - A Christmas to Remember Collection
Ink: Memento "Nautical Blue"
Colouring Medium: Copics, Sharpie "White Paint Pen"
Accessories: Go Kreate Dies Square Frame Frilly # 7, Magnolia Doohickey Dies Tilda Tag, Spellbinders Snowflakes, Yuletide Snowflakes, 2013 Snowflake Pendant, LaLaLand Three Christmas Trees, Joy Crafts Winter Wishes Icicles Border  WOC Flowers,  Lace, Pearls, Star & Seam Binding from my stash.


I will enter this card in the following challenges:


Thanks for stopping by!


Hugs


Friday, November 1, 2019

Santa's Workshop

Hello, I can't believe we are in November already! The Christmas countdown has officially begun! Christmas is my favourite time of the year. I just love to decorate my house. I always get so carried away. That brings me to today's creation. It is a project I made that was truly a labour of love. 

WARNING This is a long post with lots of pics! ;)


I have made a diorama using the new collection from The Paper Nest Dolls called North Pole, as well as some previous PND elves. 


I started with a wall hanging shelf from Kmart. I wasn't happy with the shelving sizes, so I knocked the inside shelves. I then asked my "handy" cabinet maker son to add 2 new shelves as well as the roof. I found a few items for doll house miniatures from Ebay & Doll House hobby stores. This includes the picture frame, grandfather clock, rocking horse, train & sack of reindeer feed.


For anything else I made using dies or out of Sculpey oven Clay. Wow how have I not used that stuff before!!! I absolutely love what you can do with it. So many endless possibilities. Even my daughters got in on the action. My oldest made the topiary trees & my youngest made the carrots. 


Even the door, windows, chimney, toy shelves & wallpaper border are made out of Sculpey.


On the roof level I have the Elves stacking the sleigh, using Elf Ellie with Gifts & Elf Owen.


On top level I have used Mini Mrs Clause, Mini Santa & Mini Elf from the North Pole Collection & Elf Avery with Candy Cane.


 On the middle level the Elves are hard at work making toys. I have used Elf Sewing Teddy, Elf Painting Train, Elf Avery with Christmas List & Elf with Jack-n-the-Box. I have also used Toy Soldier Owen in the background among the toys.


On the ground level I have used Mini Snowman, Mini Reindeer & North Pole Sign also from the North Pole Collection & Holiday Friends.


 These stamps can be found in digi format here & in rubber here.

Supplies:
Paper: Maja Design - I Wish "You a Happy Holiday", Graphic 45 - Twas the Night before Christmas Collection, Nutcracker Sweet Collection
Colouring Medium: Copics
Accessories: Sculpey Clay in various colours, Magnolia Doohickey Dies Volume 17, 23, Lovely Fence & Santa's Sleigh, La-La-Land Icicles Border Die, Spellbinders Holly Tags Dies, Hero Arts Snow Froth, Kmart Rectangle Wall Shelf, Vinyl Floor Boards, Straws & Ribbon & Pearls from my stash.

Thanks for stopping by!

Hugs


Tuesday, October 1, 2019

French Girl Celine

Hello, today I am back sharing a card for the Paper Nest Dolls. It is school holidays now in Australia. Next term is the last term for my youngest in primary school then off to high school next year! Wow I still can't believe it that I have been taking my kids there for 20 years! I feel like part of the furniture lol.

Well enough of me ranting...... kids will be awake soon! For my inspiration card today I am using the stylish "French Girl Celine".


I've coloured her with Copics and kept it quite simple.


Isn't she adorable with her pet poodle!


This adorable image is available in rubber which can be found here & in digi format which can be found here.

Supplies:
Stamps: Paper Nest Dolls "French Girl Celine", Magnolia "New York"
Paper: Fabscraps - Paris
Colouring Medium: Copics
Accessories: Spellbinders Elegant Ovals Dies, Magnolia Doohickey Die Heart Swirl, La La Land Die Eiffel Tower,  Fran-tage Chunky White, WOC Flowers, Ribbons & Rhinestones from my stash.

Thanks for stopping by!

Hugs


Wednesday, September 25, 2019

Princess with Rose

Hello, today I am back sharing an inspiration card for Paper Nest Dolls. Spring has finally sprung here in Australia. Love hearing all the birds chirping & singing in the yard & seeing all the colourful flowers blooming. With that as my inspiration I decided to go with a princess card today! Eek Christine has done a wonderful job with all her princesses & it's always so hard to pick one!!!


Well here she is, I have gone with Princess with Rose


I did not go crazy with embellishments & flowers for this card.......yes that's actually a struggle for me hehe. I decided to keep it as simple as possible as the image is gorgeous & really speaks for itself!


This gorgeous image is available in rubber which can be found here & in digi format which can be found here.

Supplies:
Stamp: Paper Nest Dolls "Princess with Rose"
Paper: Gold Foil Cardstock, Pion - Songbirds Secret Collection
Colouring Medium: Copics
Accessories: Spellbinders APG Tiara Rondelle die, Rhinestones & Lace from my stash.


Thanks for stopping by!

Hugs


Saturday, August 31, 2019

Sina Memory Box

Hello, yes it's me again for the second time today! The days, months & year are flying so fast that I did not get a chance to post this sooner! It's just under 4 month's till Christmas & I finally made my first Christmas card for the year :) 


Suha from Swedish House Crafts has a gorgeous new brand of digi stamps called Hi Cookie. She has hand drawn these herself! The new & first collection now available is called Hi Cookie - Christmas Surprise.  Today I am using the beautiful image called Sina Memory Box.


I decided to go with a warm vintage look on my card with warm browns & reds.


This adorable image is available here. Be sure to check out all the other adorable images from the Hi Cookie - Christmas Surprise Collection as well.


Supplies:
Stamp: Hi Cookie "Sina Memory Box", Magnolia "Sparkling Snowflakes"
Paper: Maja Design - I Wish Collection
Ink: Distress Ink Old Paper
Colouring Medium: Copics
Accessories: Go Kreate Dies Square Frame Frilly # 5, Magnolia Doohickey Dies Tilda Tag, Santa's Sleigh & Snowman, Wild Rose Studio Die Winter Lacey Snowflake, Martha Stewart Branch Punch, WOC Flowers, Frantage,  Ribbon & Mesh from my stash.


I will enter this card in the following challenges:
Magnolia-Licious Blog Challenge ~ Hi Cookie
Swedish House Crafters Lounge  August Challenge Facebook ~ Hi Cookie
Swedish House Crafts Blog Challenge ~ Hi Cookie


Thanks for stopping by!


 Hugs