Sunday, December 31, 2023

Elf Avery with Candy Cane & Reindeer Ellie with Ornament

 Hello Crafty Friends, I hope you all had a wonderful Christmas. I am just popping in today to share 2 more Christmas cards before we ring in the new year.

Today I am sharing some D.T. inspiration for The Paper Nest Dolls & Xpress-It, using the digital stamps called Elf Avery with Candy Cane & Reindeer Ellie with Ornament, and some glitter deco tape.


For my cards I have created a 5x7 mat base. I then coloured my images & trimmed to size. For my Elf Avery card I cut a strip of paper slightly smaller than my base & stuck down 2 strips of each colour of Glitter Deco Tape. I then glued die cut letters on top to make my "MERRY" sentiment. You can see a video of how I did this on Instagram here.

For my Reindeer Ellie card it was the same process using only one strip of the Glitter Deco Tape then after adding the Glitter Deco Tape I ran my cardstock through the die cutting machine using some bauble dies. I then added some glitter thread & gems to embellish.


Copics:
Clothes & Candy Cane: BG000, BG01, BG02, BG05, RV00, RV63, RV66, BG10, BG15
Skin: E0000, E000, E00, E11, R20 
Hair: E30, E33, E35, E37


Copics:
Clothes & Baubel: BG000, BG01, BG02, BG05, RV00, RV63, RV66, BG10, BG15
Skin: E0000, E000, E00, E11, R20 
Cat & Shoes: C00, C1, C2, C4, C9
Hair: E41, E43, E44


Elf Avery with Candy Cane is available in digital stamp here


Reindeer Ellie with Ornament available in digital stamp here & rubber stamp here.


Supplies:
Accessories: X-press Deco Tape & Clear Gel Glue, Spellbinders Build a Stocking, 2011 Heirloom Ornaments & 2013 Heirloom Ornaments Dies, Doodlebug Design Adhesive Rhinestones.


For more inspiration, check out my Instagram!


Thanks for stopping by!


Hugs

Noelene x  


Saturday, December 23, 2023

Santa Snowman

Hello Crafty Friends, I am back again today with some more Christmas inspiration this time for Rachelle Anne Miller Creative Studios

This time I am using a RAM Stamps image from the Penguin & Snowman - Snowy Christmas Collection, called "Penguin & Snowman: Santa Snowman"


 I started out by blending some alcohol markers onto X-press It Blending Card. Once this was dry I brushed lightly some X-press It Gold Size adhesive in small amounts where I wanted my Gold Leaf Flakes to go. After 10 minutes of curing I lightly brushed on my Gold Leaf Flakes over the areas I added the adhesive. I then created a 5x7 base to create my card using the blended base for the background before adding my coloured image on top to finish off with a die cut sentiment on top! I even added the Gold Leaf Flakes to the sentiment. I love how it turned out!


Copics:
Snowman: B79, V12, V15, V17, Y35, Y38
Penguin: C0, C1, C3, C7, C9
Squirrel: E21, E23, E25

You will find Penguin & Snowman Santa Snowman here

Don't forget to check out the other new images called "Penguin & Snowman Sledding", "Penguin & Snowman: From all of us" & "Penguin & Snowman: Christmas Gifts"! 

Want them all? Then just bundle & save here !


You will find the matching digital paper pack Snow Christmas here!


Use coupon code NOELENE for 10% off your purchase!


Supplies:
Alchol Ink - Purple Twilight & Opulent
Accessories: MFT Stiched Scalloped Basic Edges 2 Die,  Alcohol Blending Solution, X-press It Gold Size & Gold Metal Leaf Flakes, Spellbinders Ho Ho Ho Dies.


For more inspiration, check out my Instagram!


Thanks for stopping by!


Hugs

Noelene x   

North Pole Mini Santa

Hello Crafty Friends, I am back today with some D.T. inspiration for the Paper Nest Dolls

Today I created a card using one of my favourite Santa images from PND called North Pole Mini Santa.


Recently I had the oppurtunity to try out some Gold Leaf Flakes from X-press It! I started out by blending some alcohol markers onto X-press It Blending Card. Once this was dry I brushed lightly some X-press It Gold Size adhesive in small amounts where I wanted my Gold Leaf Flakes to go. After 10 minutes of curing I lightly brushed on my Gold Leaf Flakes over the areas I added the adhesive. I then created a 5x7 base to create my card using the blended base for the background before adding my coloured image on top to finish off with a die cut sentiment on top! I even added the Gold Leaf Flakes to the sentiment. I love how it turned out!


Copics:
Hair & Fur: C1, C2, C3, C5, C7, C9
Skin: E0000, E000, E00, E11, E13, 
Clothes: R20, R22, R24, R27, R29

North Pole Mini Santa is available in digital stamp here


This stamps is also available in rubber as part of the North Pole set here.


Supplies:
Alcohol Ink - Gumball & Deception
Accessories: MFT Stiched Scalloped Basic Edges 2 Die,  Alcohol Blending Solution, X-press It Gold Size & Gold Metal Leaf Flakes, Spellbinders Ho Ho Ho Dies.


For more inspiration, check out my Instagram!

Thanks for stopping by!


Hugs

Noelene x  

Tuesday, December 19, 2023

Christmas Blessings


Hello everyone, today I have a card to share using some adorable Christmas Nativity images from Rachelle Anne Miller Creative Studios.

Nativity cards are my favourite Christmas cards, so today I have created a box card using some digital stamps from Ram Stamps called "Nativity Scene Creator" and "Nativity".

I printed & coloured my images on some X-Press It blending paper. I then used the same blending paper to print my digital papers using the Ram Stamps "Snowy Christmas" digital pattern paper pack.  Then I assembled my box card & glued all the pieces into place.


Copics:
Clothes: E21, E23, E25, E27, E30, E31, E34, BG00, BG01, BG05, RV32, RV32, RV34, T1, T2, T4  
Magner & Palm Trees: E21, E23, E25, G21, G24, G28, 
Donkey & Sheep: T1, T2, T4, BG41, BG45
Skin: E0000, E000, E00, E11, R20
Star & Hay: Y00, Y02


You will find "Nativity Scene Creator" here and "Nativity" here!


You will find the matching digital pattern paper pack Snowy Christmas here!


Use coupon code NOELENE for 10% off your purchase!


Supplies:
Sentiment: Computer Generated
Digital Paper: Snowy Christmas Digital Pattern Paper Pack. 
Colouring Medium: Copics
Accessories: MFT Outside the Box Level Up & Snow Drifts Dienamic, Xpress It Clear Gel Glue & Double Sided Tape.    

For more inspiration, check out my Instagram!


Thanks for stopping by!

Hugs

Noelene :)  

Friday, December 1, 2023

Mr & Mrs Clause

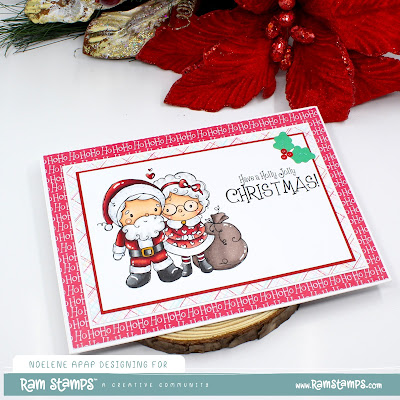
 Hello Crafty Friends, it's the first day of Summer & we are officially in December! Yay it's my favourite month of the year & the count down to Christmas has officially begun. 

Today is also release day over at Rachelle Anne Miller Creative Studios with a new collection called "Holly Jolly Christmas" with 4 new adrable digi stamps along with a coordinating "Holly Jollly Christmas" digital pattern paper pack. 

For my card today I have used the "Mr & Mrs Clause" digital stamp from the new release. Isn't it just one of the most adorable images of Mr & Mrs Clause you have ever seen? I imagine Santa giving Mrs Clause one last cuddle before he takes off on his big day!


I started out by printing the Ho Ho Ho & Multi Gingham digital printed papers onto some X-Press it paper. Then I cut to size starting with a 5"x7" base & worked my way up layering the stack. I then printed the "Mr & Mrs Clause" digital stamp using the sentiment from the "Holly Jolly Elf" digital stamp. After colouring my image & adhering down onto my base I finished off my card using a holly die with some red sprinkles to embellish.


Copics:
Boots & Belt: N2, N4, N7, N9, E23, Y17
Skin: E0000, E000, E00, E11, R20
Clothes: C5, R22, R29, R59
Sack: E71, E74, E77, E79
Fur: C0, C1, C2, C4
Hair: N0, N1, N2


You will find "Mr & Mrs Clausehere

Don't forget to check out the other new digital stamps called "Holly Jolly Elf", "Peace Angel" & "Oh Christmas Tree"!  Want them all? Then just bundle & save here !


You will find the matching digital pattern paper pack Holly Jolly here!


Use coupon code NOELENE for 10% off your purchase!


Supplies:
Sentiment: Holly Jolly Elf
Paper: Holly Jollly Christmas Digital Pattern Paper Pack. 
Colouring Medium: Copics
Accessories: Spellbinders Build a Stocking Die, Doodlebug Design Sprinkles.


For more inspiration, check out my Instagram!


Thanks for stopping by!

Hugs

Noelene :)  

Monday, November 27, 2023

Australian Birds

 Hello Crafty Friends, let me tell you a story. Last year I decided to plant some pretty Sunflowers to make a happy border at the edge of my veggie patch. I used to love looking out my window seeing the beautiful big yellow flowers blooming............till one day a flock of Cockatoos decided to come feasting on them. Haha I still remember them flying off into the sunset, while still carrying whole sunflower heads & whatever else took their fancy, as I tried to shoo them away. Unfortunately I learn't the hard way, don't plant Sunflowers near your veggies!

Which brings me to my card I am sharing today using another one of the images from RAM Stamps  Aussie Christmas set. It features the "Australian Birds" digital stamp. These cute little guys don't look like they want to feast in my garden!


I coloured my image with Some Uniball Signo glitter pens & Copics on some X-Press It Blending Card. I then printed the gum leaves paper from the "Aussie Christmas" coordinating papers. I trimmed my coloured image to fit onto a layer of green glitter cardstock leaving a thin edge on the bottom & top. I placed this onto a die cut border & finished off by placing of top of a 5x7 base of my printed paper.


Copics:
Branch & Leaves: W00, W1, G0000, G05
Kookaburra: E30, E31, T0, T3, T4
Wren: RV00, RV02
Cockatoo: BV00, BV20


You will find "Australian Birdshere

Don't forget to check out the other new images called "Sweet Koala Christmas", "Light Up Emu" & "Kangaroo Christmas Surprise"! 

Want them all? Then just bundle & save here !


You will find the matching "Aussie Christmas" digital paper pack Snow Christmas here!


Use coupon code NOELENE for 10% off your purchase!


Supplies:
RAM Stamps Digital Paper: Aussie Christmas
X-Press It Blending Paper
Colouring Medium: Copics & Uniball Signo Glitter Pens
Accessories: MFT Stitched Scalloped Basic Edges 2 Die. 


For more inspiration, check out my Instagram!

Thanks for stopping by!

Hugs

Noelene :)  

Wednesday, November 22, 2023

Ice Cream Cravings

  Hello Crafty Friends, I am back today with some D.T. inspiration for the Paper Nest Dolls

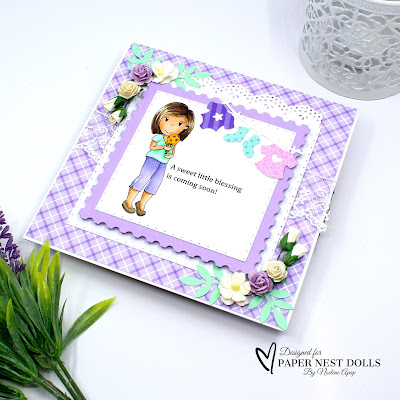
It seems lately I cannot have enough baby cards on hand! This time it was for a gender reveal. So today's card features the yummy mummy image from PND called Ice Cream Cravings.


I printed & coloured my image with Copics on some X-Press It blending paper. I created my card using layers of die cut squares onto a 6x6 base. I embellished it with some cute die cuts of baby clothes & lace & flowers to finish.


Copics:
Hair & Shoes: E41, E43, E44, E47, E49
Skin: E0000, E000, E00, E11, R20
Ice Cream: Y15, T19, E21, E23
Pants: BV00, BV01, BV02
Shirt: G000, G00, G02


Ice Cream Cravings is available in rubber here & digital stamp here


Supplies:
Paper: Doodlebug Design - Petite Prints
Sentiment: Computer Generated
X-Press It Blending Paper
Accessories: Lalaland Crafts Clothesline Banner, Spellbinders Postage Edge Square Dies, Martha Stewart Frond & Vintage Doily Punch, WOC Flowers & Lace from my stash.


For more inspiration, check out my Instagram!

Thanks for stopping by!

Hugs

Noelene x

Monday, November 20, 2023

Light Up Emu

 Hello Crafty Friends, the one thing I truly love about living in Australia is the beauty of our adorable native animals unique to this country. Last month RAM Stamps released an Aussie Christmas set with 4 new digi stamps of some of our favourite furry friends along with a coordinating "Aussie Christmas" digital paper pack. 
 
For my card today I have used "Light Up Emu". Love how his little Koala friend rides on his back!


I coloured my image with Some Uniball Signo glitter pens & Copics on some X-Press It Blending Card. I then printed the holly paper from the "Aussie Christmas" coordinating papers. I trimmed my coloured image to fit onto a 5x7 base leaving some space on the left for my coloured paper. I then cut a 2cm strip of my coloured printed paper & a thin strip of some red glitter paper for a pretty edge. Lastly I glued my coloured paper strips into place & embellished with some red sprinkles.


Copics:
Santa Hat: R24, R27, R29, Silver Glitter Pen
Lights: Red & Green Glitter Pen
Emu: E43, E44, E71, E74, E77
Stars: Gold Glitter Pen
Koala: N0, N3, 100


You will find "Light Up Emuhere

Don't forget to check out the other new images called "Sweet Koala Christmas", "Australian Birds" & "Kangaroo Christmas Surprise"! 

Want them all? Then just bundle & save here !


You will find the matching "Aussie Christmas" digital paper pack Snow Christmas here!


Use coupon code NOELENE for 10% off your purchase!


Supplies:
Stamp: RAM Stamps -  Light Up Emu
RAM Stamps Digital Paper: Aussie Christmas
X-Press It Blending Paper
Colouring Medium: Copics & Uniball Signo Glitter Pens
Accessories: Doodlebug Design Sprinkles. 


For more inspiration, check out my Instagram!

Thanks for stopping by!

Hugs

Noelene :)  

Monday, November 13, 2023

Christmas Peace

Hello Crafty Friends, I have another Christmas card for you today from  RAM Stamps.  Today's card features a heavenly image called "Christmas Peace". 


After colouring my image I masked & blended the background with ink and added some white opaque splatters.  I then placed the frame onto cardstock with foam for dimension & built a 5x7 base onto some printed cardstock. 


Copics:
Skin: E0000, E000, E00, E11, E13, R20 
Angel: Y13, Y15, Y17, C00, C02
Peace: RV02, RV04, RV06
Hair: E41, E43, E44


"Christmas Peace" is available here!


Don't forget to check out the other new images in the release,  "Christmas Joy", "Christmas Merry" & "Christmas Noel".


Use coupon code NOELENE for 10% off your purchase!


Supplies:
Paper: Doodlebug Design - Petite Prints
Colouring Medium: Copics
Taylored Expression Ink - Confetti Cake, Cookie Monster, Tropical Punch
Accessories: Spellbinders 5x7 Matting Basics A & B Dies, Spellbinders, Copic Opaque White.


For more inspiration, check out my Instagram!


Thanks for stopping by!


Hugs


Noelene :)


Saturday, November 11, 2023

Stone Age Boy & Dinosaur

 Hello Crafty Friends, I am back today with some D.T. inspiration for the Paper Nest Dolls


Today I have a birthday card to share using one of the images from the PND Stone Age Family set.
 I have made a birthday card using the 2 images from this set, Stone Age Boy & Dinosaur.


This is a super cute set released in 2022 based on our favourite cave man family The Flinstones. The set comes with 8 different images so you can mix & match to your hearts content to create different scenes. I created my card on a 5"x7" base & shaded the background after masking my image. Lastly I added the sentiments & some shaped sprinkles to embellish.


Copics:
Dinosaur: V04, V05, V06, YR18, YR12, B0000, B000, B00, B01
Skin: E0000, E000, E00, E11, E13, R20
Hair & Bone: W00, W0, W2, W4
Clothes: E18, E19, E53, E55, C8
Club: YG61, YG63, YG67


Stone Age Family is available in rubber here & digital stamp here


Supplies:
Sentiment: Doodlebug Design - Happy Birthday
Distress Ink - Antique Linen
Paper: Doodlebug Design - At the Zoo
Accessories: Spellbinders 5x7 Matting Basics A & B Dies, Doodlebug Design Large Tag Doodle Cuts, Doodlebug Design Sprinkles.


For more inspiration, check out my Instagram!


Thanks for stopping by!


Hugs

Noelene x