Showing posts with label Christmas. Show all posts

Thursday, July 23, 2026

3D Christmas Santa Bouquet

Hello crafty friends! Today I am sharing a tutorial of the 3D Christmas Santa Bouquet (SVG). 


To start cut out all your pieces. I then embossed my santa suit using a Christmas embossing folder.


Glue all your panels in place. I valley folded the small piece of the envelope & applied glue to the tabs. I aligned it to the bottom & sides of the larger piece. This creates the pocket.


Now to create the mechanism. 


Fold the little tab then fold the mechanism in half & glue the tab down.


For the easel leg glue the single tab to the back, then wrap the rest around going to the back & bringing it to the front glueing each tab. This is to make the easel leg sturdy.


Next valley fold both ends in so that it forms an X.


Now apply glue to the mechanism making sure you do not go past the fold on the easel leg.


Now place the glued mechanism on the inside of one of the pot panels making sure to align the leg to the bottom. It should sit a few millimeters beneath the top. Now glue the top part of the mechanism only & place the other pot panel on top. Hold down for a minute or so till it dries. Now glue the tabs to the inside.


Next take the larger foliage panel with Santa & turn it over. You want to apply glue on the back of the bottom square part. Now turn it over so you can see your front panels & gently slide it in between the back of your X. The glued square should be stuck onto the back pot panel. Now with the smaller foliage panel you will apply the glue onto the front side of bottom square. This time you will slide it into your X on the front folded part of the mechanism so that the glue adhers to the front pot panel. 


To make your bouquet stand on its own gently squeeze the sides of the pot & fold in the leg of your mechanism. To fold flat place it back down again.


I hope you enjoyed my tutorial today! You can also buy the 3D Christmas Bouquet Bundle here, which also features 3D Christmas Tree Bouquet, (which I created here), and 3D Christmas Reindeer Bouquet.


Use coupon code NOELENE for 10% off your purchase anytime at Lori Whitlock Shop!

Supplies:
Paper:  Doodlebug Design - Christmas Magic
SVG File: Lori Whitlock - 3D Christmas Santa Bouquet (SVG)
Accessories:  Spellbinders Holly Flourish Embossing Folder, Doodlebug Sprinkles.

For more inspiration, check out my Instagram!

Thanks for stopping by!

Hugs

Noelene :)    


Tuesday, July 14, 2026

3D Christmas Tree Bouquet - July Blog Hop with Lori Whitlock


Hello friends! Welcome to the Lori Whitlock July Blog Hop!

Blog Hop Order:
Noelene Apap <--You are here

Today I am sharing one of the Christmas 3D Bouquets from Lori Whitlock called 3D Christmas Tree Bouquet (SVG).


I decided to go with pastel candy land colours for my card.


I added clitter cardstock as well as glitter dot sprinkles for embellishments. 


For today only, you can download the A2 Curved Pop Up Summer Card SVG file absolutely FREE! Just add it to your cart and complete checkout - no codes, no catches, just a fun little treat from us to you.


Don't forget the sale!


Be sure to enter the giveaway!embed code:

For more fun projects & inspiration today from the Creative Team make sure you hop along to each blog! 

That's all from me today!

For more inspiration, check out my Instagram!

Thanks for stopping by!

Hugs

Noelene :)  

Thursday, December 25, 2025

3D Hot Cocoa Mug with Cookies for Santa

 Merry Christmas Crafty Friends!🎅
Did you make sure you left some cocoa & cookies for Santa? 
Today I am popping in for a quick tutorial to show you how I made this cute 3D Hot Cocoa Mug (SVG, Silhouette) & Cookies for Santa (SVG, Silhouette), from Lori Whitlock.


First cut out all your pieces & glue your panels on.


Next glue the 2 handle pieces together then glue the handle tab to the inside of a mug panel.


Now valley fold all your mug tabs & start glueing each piece one by one. It helps to slightly bow the panels inward before you start glueing.


Now fold the tabs down for your cocoa lid. Next take the white froth piece & fold inwards each panel. Then gently one by one overlap each panel till they sit in place, but do not push down all the way. Now glue the froth onto the cocoa lid. The lid sits on top so you can put some treats inside the mug.


To make your saucer & plate, valley fold your scored plates & glue the end tab on the base. 


Then take the hexagon piece & glue that down onto the bottom centre.


Then on one of the plates stick down your biscuits. I used foam tabs to create a bit of dimension. Now mountain fold your cookies sign & your done!


They make the cutest little gift with treats inside! Or even a prop for your Elf on the Shelf!


Don't forget to check out all the other 3D Mugs, which include 3D Hot Cocoa Mug Penguin (SVG, Silhouette), 3D Hot Cocoa Mug Santa (SVG, Silhouette), 3D Hot Cocoa Mug Snowman (SVG, Silhouette), 3D Hot Cocoa Mug Gnome (SVG, Silhouette), 3D Hot Cocoa Mug Polar Bear (SVG, Silhouette). They can also be found in a Bundle, which includes all the 6 3D Mugs & the Cookies for Santa, (SVG).


Supplies:
Paper: Doodlebug Design - Petite Prints
SVG File: Lori Whitlock - 3D Hot Cocoa Mug (SVG, Silhouette)
- Cookies for Santa (SVG, Silhouette)

Use coupon code NOELENE for 10% off your purchase anytime at Lori Whitlock Shop!

For more inspiration, check out my Instagram!

🌟Wishing you & all your loved ones a Blessed Merry Christmas & a Safe & Happy New Year!🌟

Thanks for stopping by!

Hugs

Noelene :)  

Tuesday, December 9, 2025

Reindeer Pop Dot Card - December Blog Hop with Lori Whitlock


Hello friends! Welcome to the Lori Whitlock December Blog Hop!

Blog Hop Order:
Noelene Apap <--You are here

Hello Crafty friends, you may remember last month I shared the Snowman Pop Dot Card. Well today I am sharing another called Reindeer Pop Dot Card from Lori Whitlock, (SVG, Silhouette).

I raised some of my panels using pop dots for dimension as well as the whole reindeer onto the base of the card. I inked the edges & used embossing folders on the top of the hat & scarf for a little more detail. 
Tip - Always cut panel pieces first before you emboss, then lightly spray with water before you run panel through your machine with embossing folder. I did omit the water spray this time as I did not want the ink to run.
For my base panel I used some Shabby White Embossing Enamel for some gold & white texture.
I wanted to have a border on my base so I enlarged it by .125" to create the border.


You can also purchase the bundle here & save!


For today only, you can download the Flat Christmas Box SVG file absolutely FREE! Just add it to your cart and complete checkout - no codes, no catches, just a fun little treat from us to you.


Don't forget the sale!


Be sure to enter the giveaway!

For more fun projects & inspiration today from the Creative Team make sure you hop along to each blog!  That's all from me today. 

If you miss the sale you can still use coupon code NOELENE for 10% off your purchase anytime at Lori Whitlock Shop!

Thanks for stopping by!

For more inspiration, check out my Instagram!

Hugs

Noelene x

Tuesday, November 11, 2025

Snowman Pop Dot Card - November Blog Hop with Lori Whitlock


Hello friends! Welcome to the Lori Whitlock November Blog Hop!

Blog Hop Order:
Noelene Apap <--You are here

Today I am sharing a fun Snowman Pop Dot Card from Lori Whitlock, (SVG, Silhouette).
This is a fun & easy card to make. I raised some of my panels using pop dots for dimension as well as the whole snowman onto the base of the card & embellished with stickels for the buttons & holly. I used embossing folders on the top of the hat & scarf for a little more detail. 
Tip - Always cut panel pieces first before you emboss, then lightly spray with water before you run panel through your machine with embossing folder.


For today only, you can download the Handle Box Fall Pumpkin SVG file absolutely FREE! Just add it to your cart and complete checkout - no codes, no catches, just a fun little treat from us to you.


Don't forget the sale!


Be sure to enter the giveaway!

For more fun projects & inspiration today from the Creative Team make sure you hop along to each blog! That's all from me today. 

Thanks for stopping by!

For more inspiration, check out my Instagram!

Hugs

Noelene x

Tuesday, December 10, 2024

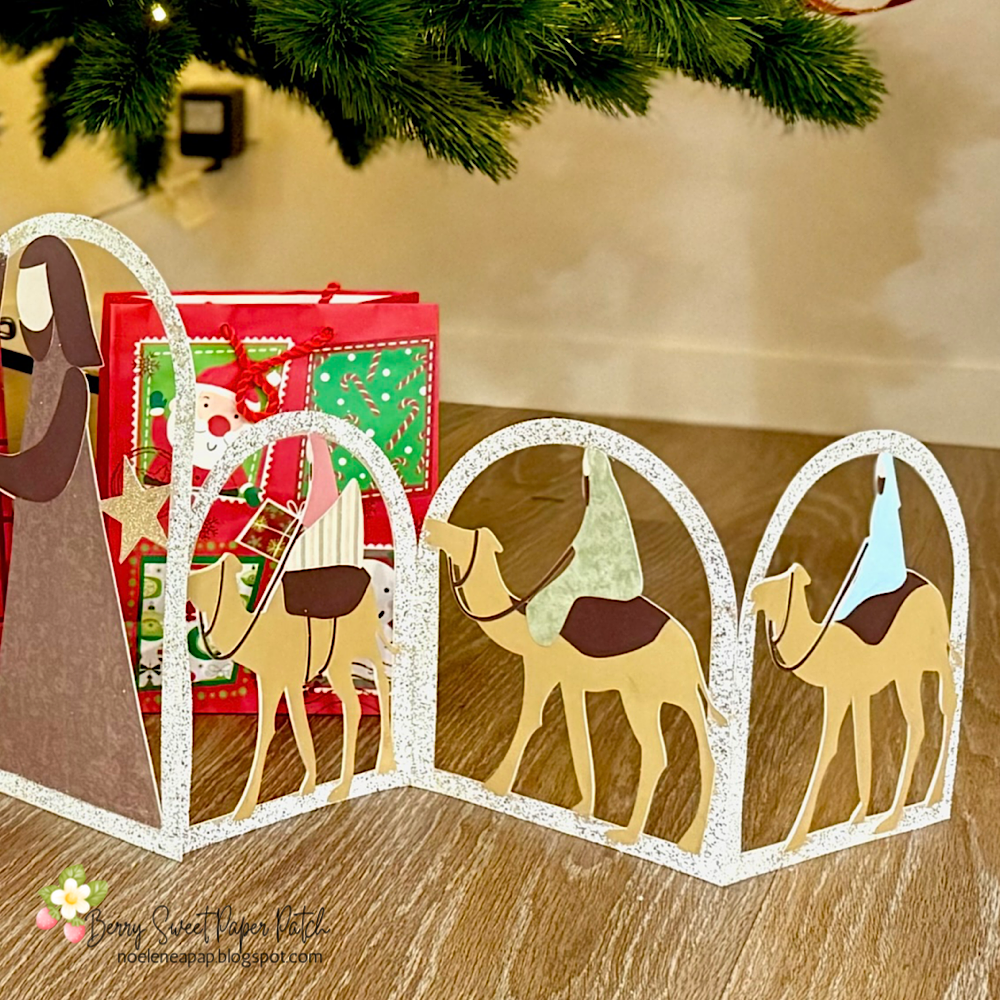
Nativity Christmas Scene Decor - December Blog Hop with Lori Whitlock


Hello friends! Welcome to the Lori Whitlock December Blog Hop!

Blog Hop Order:

Christmas in my house wouldn't be complete if I did not have a Nativity displaying the true meaning of Christmas. Today I am using the Christmas Scene Decore Nativity Bundle from Lori Whitlock (SVG Bundle, Silhouette Decore Nativity, Silhouette Decor Animals, Silhouette Decor Wise Men).


This was a fun project to make. I decided to go one step further & emboss the arch frame around my nativity to make it look like stone. 


Don't forget the sale!


Be sure to enter the giveaway!a Rafflecopter giveaway

For more fun projects & inspiration today from the Creative Team make sure you hop along to each blog! That's all from me today, your next stop on the hop is Tamara's blog. 

Thanks for stopping by!

For more inspiration, check out my Instagram!

Hugs

Noelene x 


Thursday, November 14, 2024

Fold Flat Tudor House Bundle

 Hello Crafty Friends today I am sharing my project using the Fold Flat Tudor House Bundle from Lori Whitlock (SVG, Silhouette).

These little houses make an adorable addition to your decor & then can be folded flat for storage. They are so easy to put together.


I wanted my roof to have a pattern like a real roof. So I embossed it with a scalloped design embossing folder. To do this I firstly folded the roof panel along the perforated line then gave it a light spray of water to make the cardstock more bendable without tearing. Do not use too much water because it will fuse both sides together. Now put the roof panel aside.


Next I glued the timber frame panels to the front of my house bases.


Next I turned them over & glued the coloured window frame panels to the back side making sure to carefully align any windows or doors in place.


For my windows I have used vellum incase I wanted to add any fairy lights inside my houses. I glued the vellum on top of the window frame panel.


The next step was to glue the side flaps of the building to join your 2 building pieces together. You can now close the bottom flap to create a box. Do not glue the bottom flap. This way you can simply open it & fold your building flat for storage.


Next add glue to the roof base side that is joined to the building. 


Now carefully adhere to the inside of the embossed roof piece making sure you centre it. The other side should be free & not glued down. Now fold the other side of the roof down & slide through the cut slots of the roof into the chimneys to secure it into place.


It should now look like this.


Now I wanted to go one step further & give my houses Christmas decorations. I made some embellishments using Sculpey clay & molds. You can use anything you like. Although by using raised embellishments I will need to be extra careful how I lay for storage. You can also create flat decorations using any dies or stickers in your stash. 


For more inspiration, check out my Instagram!

Thanks for stopping by!

Hugs

Noelene :)