Sunday, March 31, 2024

Easter Belly Boxes

 Happy Easter crafty friends. Easter is here & I have some fun Easter Belly Boxes to share with you today.


I have made these Easter Belly Boxes using a SVG files called Belly Box Easter Bunny 2, Belly Box Chick, Belly Box Lamb. I cut the files out using my Silhouette cutting machine then glued all the pieces together. I embossed the wool on the lamb. They were quite simple and easy to make. Lastly I embellished with some cute Stickers & filled with eggs. 


Belly Box Easter Bunny2


Belly Box Chick


Belly Box Lamb


Supplies:
Paper: Doodlebug Design - Hippity Hoppity Collection
SVG File: Lori Whitlock - Belly Box Easter Bunny 2, Belly Box Chick, Belly Box Lamb
Accessories: Doodlebug Design Shape Sprinkles, Cuttlebug D'vine Swirl Embossing Folder.


For more inspiration, check out my Instagram!

Thanks for stopping by!

Hugs

Noelene :)  


Saturday, March 30, 2024

Easter Basket Eggs Box Card

 Hello crafty friends. Easter is almost upon us & today I have a cute 3D Easter card to share with you.


I have made this Easter using an SVG file called Box Card Easter Basket Eggs. I cut out using my Silhouette cutting machine then glued all the pieces together. It was quite simple and easy to make. Lastly I embellished with some cute Easter Stickers. 


Supplies:
Paper: Doodlebug Design - Hippity Hoppity Collection
SVG File: Lori Whitlock - Box Card Easter Basket Eggs
Accessories: Doodlebug Design Shape Sprinkles & Hippity Hoppity Icons.

For more inspiration, check out my Instagram!

Thanks for stopping by!

Hugs

Noelene :)  


Tuesday, March 26, 2024

Goodnight Hippo

 Hello Crafty Friends, I am back today with some D.T. inspiration for the Paper Nest Dolls

Today I have a baby card to share using the adorable Goodnight Hippo stamp.


I created my card on a 5"x7" base & die cut a panel then shaded the background with some splaters. I fussy cut my image after colouring & stuck into place. Lastly I added the sentiments & some shaped sprinkles to embellish.


Copics:
Clothes: Y15, Y17, Y19, YG11, YG13, YG17, YR12, YR14, YR16
Hippo: C0, C1, C2, C3, C4
Bear: BG000, BG01, BG02


Goodnight Hippo is available in digital stamp here

Supplies:
Sentiment: Doodlebug Design - All Occasions
Distress Oxide - Tumbled Glass
Paper: Doodlebug Design - Petite Prints
Accessories: La La Land Crafts Scalloped Rectangles Die,  Doodlebug Design Sprinkles.

For more inspiration, check out my Instagram!


Thanks for stopping by!


Hugs

Noelene x

Friday, March 15, 2024

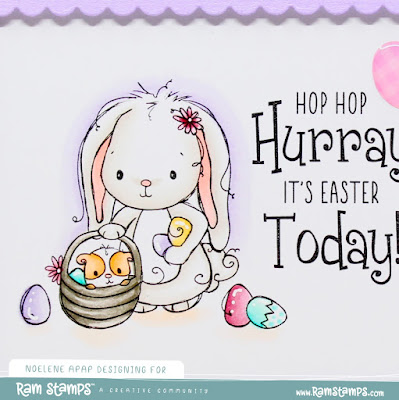
Bunny & Guinea Egg Hunt

Hello Crafty Friends, I have an Easter card to share with you today using the sweet Bunny & Guinea Egg Hunt digital stamp from  RAM Stamps.  


I created my card by layering my printed cardstock onto a 5x7 base. Once I printed & coloured my image I cut it to size & adhered it underneath my die cut frame. I then adhered this onto the centre of my card base & finished off by adding some shape sprinkles to embellish.


Copics:
Eggs: BG10, BG11, BG13, R81, R83, BV0000, BV00
Bunny & Basket: W0, W2, W4, W6, R20
Guinea Pig: YR00, YR02


You will find Bunny & Guinea Egg Hunt here

Don't forget to check out the other Bunny & Guinea digital stamps here!
  
Want them all? Then just bundle & save here !


Use coupon code NOELENE for 10% off your purchase!


Supplies:
Paper: Doodlebug Design - Hippity Hoppity Collection
Colouring Medium: Copics
Accessories: Pink Fresh Studio Stiched Scallop Rectangles Die, Doodlebug Design Shape Sprinkles.

For more inspiration, check out my Instagram!

Thanks for stopping by!

Hugs

Noelene :)  


Friday, March 8, 2024

Avery with Cross

 Hello Crafty Friends, I am back today with some D.T. inspiration for the Paper Nest Dolls


I have made a Holy Communion card using the super sweet image called Avery with Cross
I created my layout on a 6x6 base & added lots of dies cuts & flowers for my card


Copics:
Flowers: R81, R83, R85, YG41, YG45
Skin: E0000, E000, E00, E11, R20
Hair: E31, E33, E35, E37, E39
Dress: W0, W1, W2
Cross: C0, C2, C3


Avery with Cross is available in rubber here & digital stamp here


Supplies:
Sentiment: Computer Generated
Paper: Maja Design - Sofiero
Accessories: Spellbinders Elegant Ovals & Fall Foliage Dies, Leane Creatief Special Occasion 1 Dies, Magnolia Doohickey Heart Swirl Dies, Scrapiniec Host Chipboard, WOC Flowers


For more inspiration, check out my Instagram!

Thanks for stopping by!

Hugs

Noelene x

Friday, March 1, 2024

Year of the Dragon

 Hello Crafty Friends, I have a new release to show you today & this month RAM Stamps is celebrating the Year of the Dragon with 5 adorable new digital stamps & a coordinating digital paper pack.

Each Dragon stamp comes with an Element from within the Chinese Zodiac; Wood, Fire, Earth, Metal & Water. Today I am using Dragon Fire, Dragon Metal & Dragon Water digital stamps.


It is a tradition in many Asian cultures to give red envelopes containing money for luck during celebrations, so follow along today as I share with you how I made these cute money envelopes.

What You Need: 
1 x Red Cardstock (Panel) 8 1/2" x 7 3/4"
2 x Gold Metalic Cardstock 7 5/8" x 3 3/8" 
2 x Patterned Paper 7 1/2" x 3 1/4" 
1 x Gold Metalic Cardstock 7 5/8" x 1 3/8 " 
1 x Patterned Paper 7 1/2" x 1 1/4"
1 x Red Cardstock (Band) 8" x 1 1/4"
1 x Gold Metalic Scalloped Circle Die Cut

Place the panel on a score board sitting the longest side, (8 1/2"), horizontally. Score the panel at 1 1/2" & 5". Next burnish along the score lines & open flat. Now add 2 small strips of double sided tape inside the top edge & bottom edge of the shortest scored fold as pictured, then flip in towards the center to adhere into place. This now creates the pocket to hold money. Now fold closed your envelope like a card & set aside.


Before the next step print your digital patterned paper of choice, I have used A4 160gsm paper. The digital papers I have chosen for my envelopes are Circles, Lantern & Dragon.

After cutting to size, adhere the patterned papers onto the gold metallic cardstock to create the cover panels. Now adhere the large cover panels to the outside front & back of your card. Adhere the small cover panel inside your envelope on the short folded flap that holds the money. Close your card & wrap the band around your card & adhere the 2 ends together. Make sure the belly band slides freely across your envelope & is not too tight or loose. Next die cut your coloured images with a circle die. Then adhere onto the metallic scalloped die cut. Attach this to the center of the belly band covering where the two ends join on the front of the envelope. 


Copics:
Dragons: C5, R00, R22, R24, R27, R29, E00, E21, E23, N1, N4, N6, N8
Sword & Shield: N1, N4, N6, N8, E97, Y11, Y15, Y17
Rain Clouds: BG10, BG11, BG13
Fire: E97, Y11, 15, 17


Don't forget to check out the other new digital stamps called Dragon Wood & Dragon Earth!  
Want them all? Then just bundle & save here !


You will find the matching digital pattern paper pack Year of the Dragon here!


Use coupon code NOELENE for 10% off your purchase!


Supplies:
Digital Paper: RAM Stamps - Year of the Dragon
Colouring Medium: Copics
Accessories: Taylored Expressions Gold Matte Enamel Dots.


For more inspiration, check out my Instagram!


Thanks for stopping by!

Hugs

Noelene x


Challenges: