Thursday, September 14, 2023

Bee Yourself

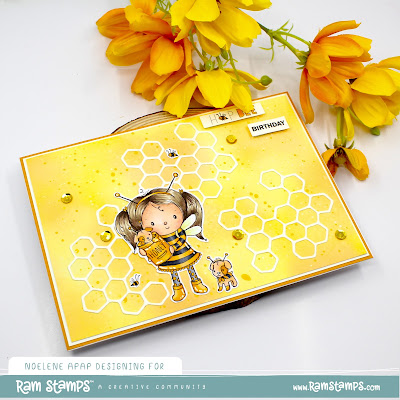
Hello Crafty Friends, today I am using another image from the new release at  Rachelle Anne Miller Creative Studios.

Although this is a Halloween image I decided to create a birthday card. This is what I love about these images, even though they were intended for Halloween they are versatile & have many uses.

 I have made a card using the new bee-utiful stamp called Bee Yourself.


I started out by ink blending my cardstock with Distress Inks then added some splatters to create the background. I die cut a honeycomb shaped die 3 times & adhered to the background. For my sentiment I got a little creative & decided to play with the word "Happy". I used the "Hoppy" sentiment from the Hoppy Birthday Bunny mini scene creator digi stamp from last months release. I have taken the letters "H" & "P"  & omitted the rest of the letters. This was easy to do & you don't need no fancy program. I just copied & pasted the sentiment twice & cropped out the letters I did not need. I then added one of the cute little bees from the Bee Yourself digi stamp to act as the letter A & then added the Bee from the sentiment portion & aligned them into place to complete my sentiment. Lastly I placed my coloured image on top & added some gold sequins to embellish.


Copics:
Hair: E42, E44, E47, E49
Dogs: YR00, YR21, YR24
Skin: E0000, E000, E00, E11, E13, R20
Bees & Clothes: C4, C5, C7, C9, Y000, Y00, Y32, Y35, Y38, 


The new release is available in store now!

Bee Yourself is available here!
 

Don't forget to check out the other new images, Ghost GreetingsPeekaboo RaccoonsTrick or Treat Mouse
    

Use coupon code NOELENE for 10% off your purchase!


Supplies:
Paper: AC Cardstock - Butterscotch
Neenah Classic Crest - Natural White
Colouring Medium: Copics
Sentiment: Digi & Computer Generated
Distress Oxide Ink - Squeezed Lemonade, Mustard Seed, Wild Honey
Accessories: Magnolia Doohickey Box Vol 10, Copic Opaque White & Sequins from my stash.


For more inspiration, check out my Instagram!


Thanks for stopping by!


Hugs


Noelene :)  

Thursday, September 7, 2023

Ellie with Flower Basket

 Hello Crafty Friends, I am back today with some D.T. inspiration for the Paper Nest Dolls
Spring has finally come in Australia & I love spending time in my garden & seeing the pretty colours of all the new flowers blooming.

Today I have a Spring themed card to share with you using the pretty PND image called Ellie with Flower Basket .


I created a 6x6 base & layered some pretty papers. I glued some lace ribbon along the bottom for a soft feminine touch.  I then placed my coloured image & arranged the die cut pieces. I finished off by adding some flowers & sprinkles to embelish.


Copics:
Clothes: R81, R83, R85
Hair: E21, E25, E27, E29
Skin: E0000, E000, E00, E11, R20
Basket & Flowers: R83, R85, R89, G43, G46, E13, E15, E18


Ellie with Flower Basket  is available in digital here.


Supplies:
Colouring Medium: Copics
Paper: Maja Design - Coffee in the Arbour
Accessories: Magnolia Lovely Umbrella Doohickey, La La Land Crafts Lattice Doily Border,
 Pierced Scalloped Ovals & Topiary Dies,  Doodlebug Design Glitter Sprinkles, 
WOC Flowers, Martha Leaf Frond Punch, Lace Ribbon from my stash.


For more inspiration, check out my Instagram!

Thanks for stopping by!

Hugs

Noelene x


Friday, September 1, 2023

Happy Halloween

 Hello Crafty Friends, have you started your Halloween projects?

I have a treat for you today, there is a new release at Rachelle Anne Miller Creative Studios called Happy Halloween with 4 new digi stamps & if that's not enough there is even some coordinating digital papers availabe with this release! Keep reading for more info.

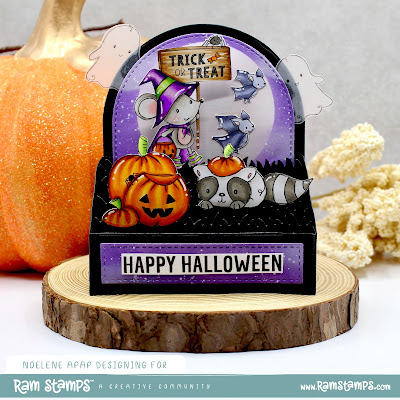
 These images are just the cutest, so I couldn't resist myself! Not only did I use one stamp from the new release but I have combined 3 stamps into a box card using Ghost GreetingsPeekaboo Raccoons & Trick or Treat Mouse


I started out by creating the base for my box card using dies. I ink blended the background & side panels with Distress Inks & used a die cut circle for masking to create my moon. I finished off my panels with some white ink splatters then stuck them down once dried.  I didn't colour in my little ghosts from the Ghost Greetings stamp, instead I printed them directly onto vellum paper & fussy cut & glued into place. I loved this effect as it gives them a transparent appearance. (Note to self.......next time place them behind tape of panel instead of glueing as glue shows through! Woops, rookie error!)  Next I coloured my images from the Peekaboo Raccoons & Trick or Treat Mouse stamps with Copics & fussy cut. I lastly glued them into place & finished off by adding the Happy Halloween sentiment from the Peekaboo Raccoons stamp.


Copics:
Clothes & Shoes: V0000, V01, V06, V09, G20, YG01, YG03, YG17
Raccoon & Mouse: W00, W0, W1, W3, W5, W7, R21
Pumpkins: E09, YR07, YR16, Y35, W10
Bats: BV20, BV23, BV25
Sign: E31, E33, E35, E37


You will find Ghost Greetings here, Peekaboo Raccoons here, & Trick or Treat Mouse here

Don't forget to check out the other new image, Bee Yourself
Want them all? Then just bundle & save here!


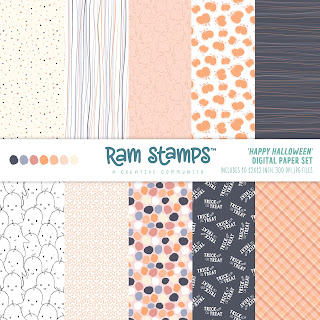
If you like printing & coordinating digital paper to go with your digi stamps, for the first time Rachelle Anne Miller Creative Studios has a new cute digital paper set availabe in the Happy Halloween release!


You can find the Happy Halloween digital paper set here

Want them all? You can buy the bundle which includes all the digtal stamps & digital papers here!


Use coupon code NOELENE for 10% off your purchase!


Supplies:
Paper: AC Cardstock - Black
Neenah Classic Crest - Solar White
Vellum Paper
Colouring Medium: Copics
Distress Oxide Ink - Villainous Potion, Wilted Violet, Pumice Stone
Accessories: MFT Outside the Box Level Up & Grassy Hills Die-namics,  Spellbinders Circle Die, Copic Opaque White 


For more inspiration, check out my Instagram!


Thanks for stopping by!

Hugs

Noelene :)