Tuesday, May 14, 2024

Strawberry Scale Box Card - May Blog Hop with Lori Whitlock


 Hello friends! Welcome to the Lori Whitlock May Blog Hop!


I am in the process of creating a Strawberry themed tiered tray for decor in my craft room! In keeping with my blog name, "Berry Sweet Paper Patch", I am wanting to make whatever decor I can out of paper. 


 I have chosen a cute file from Lori Whitlock called Box Card Lemon Scale (SVGSilhouette). I altered the original Lemon theme to a Strawberry theme by replacing the lemon elements to strawberry elements from the Lori Whitlock Strawberry Basket with Strawberry file (SVGSilhouette). Once I opened the scale file in Silhouette I slightly enlarged my file. I then opened the Strawberry Basket file & enlarged the strawberries using the lemons as a guide for size. I also included the vine & flowers. I then arranged my strawberries how I would like them to sit in my scales & created an external offset at the exact same size. As you can see in pic below, this is just a backing to glue the strawberries onto & will not be seen from the front.  You can omit this part if you prefer.  After cutting & glueing my pieces together I finished my scale by adding another strawberry, vines & flowers on the front with some enamel dots to embellish.


Don't forget the sale!


 Be sure to enter the giveaway!


For more fun projects & inspiration today from the Creative Team make sure you hop along to each blog! That's all from me today, your next stop on the hop is Tamara's blog

Thanks for stopping by!

For more inspiration, check out my Instagram!

Hugs

Noelene x

Friday, May 10, 2024

Animal Parade

Hello Crafty Friends, today I have a baby card to show you using a digital image from RAM Stamps called Animal Parade.  


My card today was simple to make. I created my card on a 5"x7" base. I cropped the bear from the rest of the image & printed then cut to size. I then shaded the background with some splaters.  Lastly I added the die cut sentiment & some shaped sprinkles to embellish.


Copics:
Bird: Y00, Y02, Y04, YG15
Drum: BG10, BG10, C30, RV02, RV04
Bear: YG13, YG11


Animal Parade is available here.


Use coupon code NOELENE for 10% off your purchase!


Supplies:
Colouring Medium: Copics
Distress Oxide - Salvaged Patina
Accessories: Doodlebug Design All Occassions Dies & Sprinkles.

For more inspiration, check out my Instagram!

Thanks for stopping by!

Hugs

Noelene x


Saturday, May 4, 2024

Rebels

Happy Star Wars Day everyone!    

For my D.T inspiration today I wanted to share with you a card I made using the 2 out of this world images from the Paper Nest Dolls called Rebel Pilot & Furry Rebel.


I started with a black 5x7 base. For my image background I wanted a galaxy look. I took out some of my alcohol inks & added random drops with the chosen colours. I then used a heat gun & blended them around till I achieved my desired look. Once this was dry I then added splatters of diluted Copic Opaque White. Lastly I fussy cut my coloured images & adhered these onto my card with some die cuts & a sentiment.


Copics:
Furry Rebel-
Fur: E42, E43, E47, E49
Belt: C2, C7, C10

Rebel Pilot-
Clothes: B37, B39, E51, E53, E55, C7, C10
Skin: E0000, E000, E000, E11, E13, R20
Hair: E21, E25, E29


Rebel Pilot digital stamp can be found here


Furry Rebel digital stamp can be found here


Supplies:
Tim Holtz Ranger Alcohol Inks - Fiesta, Vineyard, Purple Twilight, Cobalt, Glacier, Silver
Accessories: Magnolia Doohickey Galaxy Collection Dies

For more inspiration, check out my Instagram!

May the 4th be with you!

Thanks for stopping by!

Hugs

Noelene x


Saturday, April 27, 2024

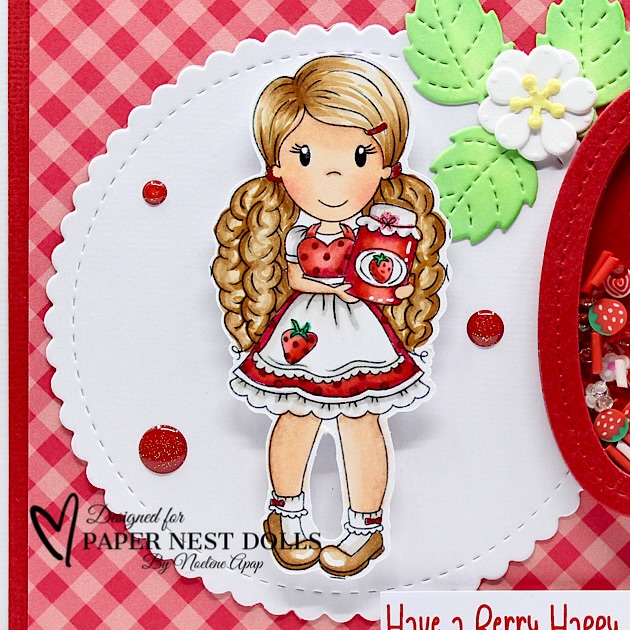
Strawberry Jam Emma

Hello Crafty Friends, I am back today with some D.T. inspiration for the Paper Nest Dolls

Today I have a berry sweet card to share using the adorable Strawberry Jam Emma stamp.


I created my card on a 5"x7" base & die cut some panels & layered. I used a scalloped die for the background of my image. I created a strawberry shaker by layering my strawberry die cut mutliple times till I got the desired height & filled some shaker sprinkles inside then covered the top with acetate & lastly another red die cut. I cut & ink blended my leaf die cuts. I fussy cut my image after colouring & adhered using foam squares for dimension. I then glued all my die cut pieces including the shaker into place. Lastly I added the sentiment & some sprinkles to embellish.


Copics:
Clothes & Jam Jar: R22, R24, R29, T0, T1, T3, G05
Hair & Shoes: E30, E33, E35, E37
Skin: E0000, E000, E00, E11, R20


Strawberry Jam Emma is available in digital stamp here

Supplies:
Colouring Medium - Copics
Sentiment: Computer Generated
Taylored Expression Ink - Key Lime & Potato Chip
Paper: Doodlebug Design - Petite Prints
Accessories: Stitched Scalloped Circle Die,  Lawn Fawn Stitched Strawberry Frame, Outside In Stitched Strawberry & Strawberry Patch Dies, Doodlebug Design Sprinkles.

For more inspiration, check out my Instagram!

Thanks for stopping by!

Hugs

Noelene x 

Tuesday, April 23, 2024

Bunny & Guinea Hoppy Garden

Hello Crafty Friends, I have a card to share with you today using another sweet digital stamp from the Bunny & Guinea collection called Bunny & Guinea Hoppy Garden from  RAM Stamps.  


I embossed a panel then layered it onto a 5x7 base. Once I printed & coloured my image I cut it to size & then adhered this onto the centre of my card base & finished it off by adding some shape sprinkles to embellish.


Copics:
Flowers & Butterflies: Y0000, Y21, YG61, YG63, R32, R30,R81, R83, BV0000, BV00
Bunny & Basket: W0, W2,  R20
Guinea Pig: YR00, YR12


You will find Bunny & Guinea Hoppy Garden  here

Don't forget to check out the other Bunny & Guinea digital stamps here!
  
Want them all? Then just bundle & save here !


Use coupon code NOELENE for 10% off your purchase!


Supplies:
Paper: Doodlebug Design - Hippity Hoppity Collection
Colouring Medium: Copics
Accessories: Spellbinders Flower Frenzy 3D Embossing Folder, Doodlebug Design Shape Sprinkles.

For more inspiration, check out my Instagram!

Thanks for stopping by!

Hugs

Noelene x


Thursday, April 18, 2024

Box Card Rainbow Unicorn

Hello Crafty friends, today I want to share how I made this cute Rainbow Unicorn Box Card with you!


For my card I chose the Box Card Rainbow (SVG, Silhouette). The Rainbow card is cute on its own, but I wanted to add a little touch of magic to my card, so I have also added the Unicorn from the Unicorn Card (SVG, Silhouette).

To start I opened both files on separate pages in Silhouette. I then copied & pasted my unicorn to the page with the Box Card Rainbow. From here I was able to resize the Unicorn to fit with my Rainbow as the original was a lot larger.


I wanted this to be a Birthday card, so I swapped out the sentiment by typing a new one using the Samantha Craft font then I print & cut.


To start I glued the little black piece to the back of Unicorn shape that has the holes cut for the eye & nostril. Then I added more glue & pasted this on top of the solid Unicorn shape.


After cutting all my pieces I glued the coloured panels onto my white corresponding pieces.


I then folded the tabs on my Rainbow shapes. The back & middle pieces I folded to the front. The small one at the front I folded to the back. Next I glued them all into place one at a time starting from the back, by first doing one side then gently folding the card flat as I go to make sure it placed evenly before I glued the tab on the other side. 


Then I added some foam squares to the back of the Unicorn & front Rainbow/Cloud & Cloud pieces to get some dimension on the card.


Lastly I adhered the cloud pieces & my Unicorn onto the card & finished off with some Star & Heart enamel stickers to embellish.


The box card folds flat to fit into 5x7 envelope!


I love how this turned out!

Supplies:
Paper: Doodlebug Design - Petite Prints
SVG File: Lori Whitlock - Box Card Rainbow & Unicorn Card
Accessories: Doodlebug Design Shape Sprinkles


For more inspiration, check out my Instagram!

Thanks for stopping by!

Hugs

Noelene :)  


Tuesday, April 9, 2024

Box Card Flower Cart - April Blog Hop with Lori Whitlock


Hello friends! Welcome to the Lori Whitlock April Blog Hop!


Mother's Day is coming up, so I made this cute Lori Whitlock Box Card Flower Cart (SVG, Silhouette).
I altered this a little by changing the original banner to say "Happy Mother's Day" instead of "Fresh Cut Flowers". I finished it off by adding some Sprinkles to embellish.


Don't forget the sale!


Be sure to enter the giveaway!

a Rafflecopter giveaway

For more fun projects & inspiration today from the Creative Team make sure you hop along to each blog! That's all from me today, your next stop on the hop is Tamara's blog

Thanks for stopping by!

For more inspiration, check out my Instagram!

Hugs

Noelene x