Happy Halloween everyone!
Today I have a special treat to show you! Do you decorate for Halloween? I am not a big fan of the scary side of Halloween & definitely not into horror, so I decided to create this "Not so spooky tree".
This will be a long post so grab a coffee & read on!
I started out by finding the perfect branch to use as my tree. That wasn't very hard as all I had to do was go to the back of my property to find one. I then cleaned off any leaves, cut the twigs back to my preferred size & spray painted it black. For my base I found a small empty box that was roughly 20cm x 21cm x 6cm. I then glued layers of foam board roughly cut to size inside my box till the layers reached the top. This is so we can have something sturdy to hold the tree in place when it sits in the box. I already had foam board scraps lying around, but you can use florist foam as well. After letting the board dry I closed the lid & drilled a hole in the center. Once I covered the box with pretty cardstock I hot glued the tree into the hole making sure I held the tree so it sat straight till the glue dried.
If you love Doodlebug products as much as I do, then you would know how cute their Halloween collections are, so I thought they would be perfect to use to make the decorations for my tree.
My Spiders & Webs, Caldrons & Lanterns were created using Svg files. I omitted the bubbles on the Caldron file for & the eyes & cheeks of my spiders & added some glitter sprinkles for dimesion.
The witches hats were created using a Witch Hat Treat Cone SVG file, which you can get for free
here. In the file the small holes on the side are on the base of the hat but I changed mine to be close to the point, as I did not want my hat to be hung up side down as originally intended.
To make the baubles I mixed 1 part water to 1 part Ranger Glossy Accents. I then swirled a small amount of the diluted Glossy Accents inside the clear bauble till all the inside was coated & drained out any excess. I poured in some glitter of my chosen colour & shook the bauble till all the inside was coated in glitter. Once these were dry I place the tops back on & added some Shape Sprinkles to decorate.
My paper Pumpkins were created by using circle dies & were very easy to make. You will find the tutorial I used
here.
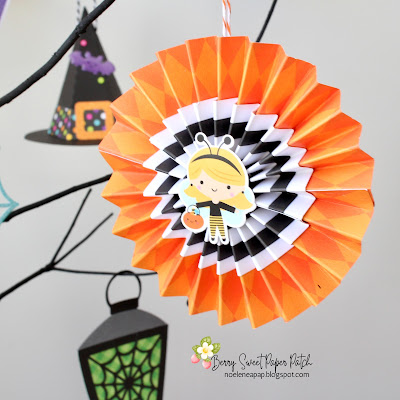
I then created some paper rosettes in various papers & placed Mini Icon Stickers in the center.
I love how these turned out, they are just the cutest!
Lastly I added some Doodlebug Chit Chat & Odds & Ends die cut cardstock pieces & more shaped sprinkles for my base to embellish.
Supplies:
Paper: Doodlebug Design - Petite Prints, Ghost Town & Candy Carnival Collections
Lori Whitlock Store SVG Files: Pumpkin Party - Caldron & Frog, Pumpkin Party - Web Lantern, Ghost Town - Spider & Web by Doodlebug Design
Dreaming Tree SVG File - Witch Hat Treat Cone
Accessories: Spellbinders Circle Dies, Ranger Glossy Accents, Clear Baubles, Glitter, Doodlebug Mini Icon Stickers, Odds & Ends Pieces, Chit Chat Pieces Sprinkles, Shape Sprinkles & Twine
Silhouette Cameo 2 Machine, Ribbon from my stash.
I hope you enjoyed my Not So Spooky Tree!
Thanks for stopping by!
Hugs
Noelene :)




.JPG)
.JPG)
.JPG)


