Thursday, April 18, 2024

Box Card Rainbow Unicorn

Hello Crafty friends, today I want to share how I made this cute Rainbow Unicorn Box Card with you!


For my card I chose the Box Card Rainbow (SVG, Silhouette). The Rainbow card is cute on its own, but I wanted to add a little touch of magic to my card, so I have also added the Unicorn from the Unicorn Card (SVG, Silhouette).

To start I opened both files on separate pages in Silhouette. I then copied & pasted my unicorn to the page with the Box Card Rainbow. From here I was able to resize the Unicorn to fit with my Rainbow as the original was a lot larger.


I wanted this to be a Birthday card, so I swapped out the sentiment by typing a new one using the Samantha Craft font then I print & cut.


To start I glued the little black piece to the back of Unicorn shape that has the holes cut for the eye & nostril. Then I added more glue & pasted this on top of the solid Unicorn shape.


After cutting all my pieces I glued the coloured panels onto my white corresponding pieces.


I then folded the tabs on my Rainbow shapes. The back & middle pieces I folded to the front. The small one at the front I folded to the back. Next I glued them all into place one at a time starting from the back, by first doing one side then gently folding the card flat as I go to make sure it placed evenly before I glued the tab on the other side. 


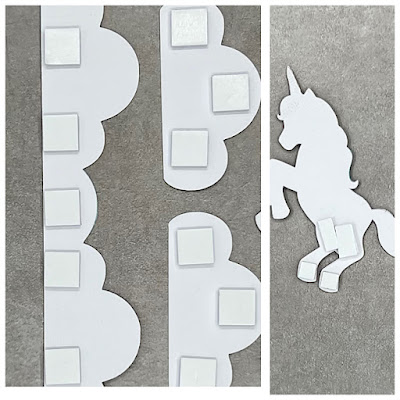
Then I added some foam squares to the back of the Unicorn & front Rainbow/Cloud & Cloud pieces to get some dimension on the card.


Lastly I adhered the cloud pieces & my Unicorn onto the card & finished off with some Star & Heart enamel stickers to embellish.


The box card folds flat to fit into 5x7 envelope!


I love how this turned out!

Supplies:
Paper: Doodlebug Design - Petite Prints
SVG File: Lori Whitlock - Box Card Rainbow & Unicorn Card
Accessories: Doodlebug Design Shape Sprinkles


For more inspiration, check out my Instagram!

Thanks for stopping by!

Hugs

Noelene :)  


Tuesday, April 9, 2024

Box Card Flower Cart - April Blog Hop with Lori Whitlock


Hello friends! Welcome to the Lori Whitlock April Blog Hop!


Mother's Day is coming up, so I made this cute Lori Whitlock Box Card Flower Cart (SVG, Silhouette).
I altered this a little by changing the original banner to say "Happy Mother's Day" instead of "Fresh Cut Flowers". I finished it off by adding some Sprinkles to embellish.


Don't forget the sale!


Be sure to enter the giveaway!

a Rafflecopter giveaway

For more fun projects & inspiration today from the Creative Team make sure you hop along to each blog! That's all from me today, your next stop on the hop is Tamara's blog

Thanks for stopping by!

For more inspiration, check out my Instagram!

Hugs

Noelene x


Friday, April 5, 2024

Happy Birthday Creator

 Hello Crafty Friends, today I have a card to show you using this month's new release from RAM Stamps called Happy Birthday Creator

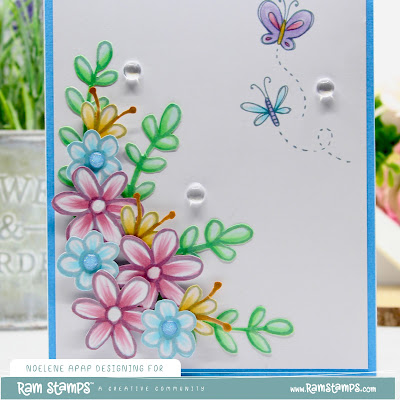
On my card I have used the Critters & Flowers & Elements from the Happy Birthday - Numbers Creator & Sentiment from the Happy Birthday - Sentiments Creator digital stamps.
This set is so versatile as you can make multiple cards with completely different looks.


I started out by sizing & printing my images onto X-Press It blending paper. I printed the sentiment & critters separately on one side of the page as I was going to use this as the panel & cut it to 4 3/4 x 6 3/4. I then fussy cut my flowers & coloured them with copics. After arranging my flowers I adhered them onto my panel & used some foam squaires on some of the flowers to give dimension. I placed my panel onto a blue frame. Lastly I glued some clear beads & Sprinkles to embellish & added some Wlink of Stella for sparkle.


Copics:
Purple: BV000, BV00
Yellow: YR0000, Y21
Green: G0000, YG41
Blue: B000, B00
Red: R81, R83


Make sure you check out the rest of the collection!


Use coupon code NOELENE for 10% off your purchase!


Supplies:
Colouring Medium: Copics
Accessories: Doodlebug Design Sprinkles, Wink of Stella GL Clear, & Beads from my stash.


For more inspiration, check out my Instagram!


Thanks for stopping by!

Hugs

Noelene x

Sunday, March 31, 2024

Easter Belly Boxes

 Happy Easter crafty friends. Easter is here & I have some fun Easter Belly Boxes to share with you today.


I have made these Easter Belly Boxes using a SVG files called Belly Box Easter Bunny 2, Belly Box Chick, Belly Box Lamb. I cut the files out using my Silhouette cutting machine then glued all the pieces together. I embossed the wool on the lamb. They were quite simple and easy to make. Lastly I embellished with some cute Stickers & filled with eggs. 


Belly Box Easter Bunny2


Belly Box Chick


Belly Box Lamb


Supplies:
Paper: Doodlebug Design - Hippity Hoppity Collection
SVG File: Lori Whitlock - Belly Box Easter Bunny 2, Belly Box Chick, Belly Box Lamb
Accessories: Doodlebug Design Shape Sprinkles, Cuttlebug D'vine Swirl Embossing Folder.


For more inspiration, check out my Instagram!

Thanks for stopping by!

Hugs

Noelene :)  


Saturday, March 30, 2024

Easter Basket Eggs Box Card

 Hello crafty friends. Easter is almost upon us & today I have a cute 3D Easter card to share with you.


I have made this Easter using an SVG file called Box Card Easter Basket Eggs. I cut out using my Silhouette cutting machine then glued all the pieces together. It was quite simple and easy to make. Lastly I embellished with some cute Easter Stickers. 


Supplies:
Paper: Doodlebug Design - Hippity Hoppity Collection
SVG File: Lori Whitlock - Box Card Easter Basket Eggs
Accessories: Doodlebug Design Shape Sprinkles & Hippity Hoppity Icons.

For more inspiration, check out my Instagram!

Thanks for stopping by!

Hugs

Noelene :)  


Tuesday, March 26, 2024

Goodnight Hippo

 Hello Crafty Friends, I am back today with some D.T. inspiration for the Paper Nest Dolls

Today I have a baby card to share using the adorable Goodnight Hippo stamp.


I created my card on a 5"x7" base & die cut a panel then shaded the background with some splaters. I fussy cut my image after colouring & stuck into place. Lastly I added the sentiments & some shaped sprinkles to embellish.


Copics:
Clothes: Y15, Y17, Y19, YG11, YG13, YG17, YR12, YR14, YR16
Hippo: C0, C1, C2, C3, C4
Bear: BG000, BG01, BG02


Goodnight Hippo is available in digital stamp here

Supplies:
Sentiment: Doodlebug Design - All Occasions
Distress Oxide - Tumbled Glass
Paper: Doodlebug Design - Petite Prints
Accessories: La La Land Crafts Scalloped Rectangles Die,  Doodlebug Design Sprinkles.

For more inspiration, check out my Instagram!


Thanks for stopping by!


Hugs

Noelene x

Friday, March 15, 2024

Bunny & Guinea Egg Hunt

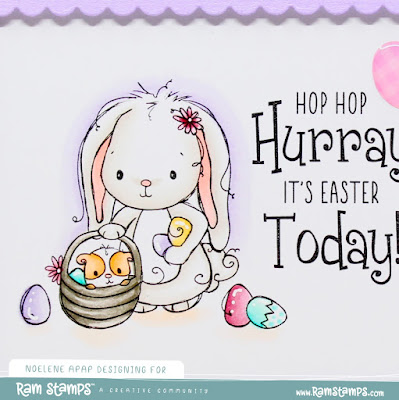
Hello Crafty Friends, I have an Easter card to share with you today using the sweet Bunny & Guinea Egg Hunt digital stamp from  RAM Stamps.  


I created my card by layering my printed cardstock onto a 5x7 base. Once I printed & coloured my image I cut it to size & adhered it underneath my die cut frame. I then adhered this onto the centre of my card base & finished off by adding some shape sprinkles to embellish.


Copics:
Eggs: BG10, BG11, BG13, R81, R83, BV0000, BV00
Bunny & Basket: W0, W2, W4, W6, R20
Guinea Pig: YR00, YR02


You will find Bunny & Guinea Egg Hunt here

Don't forget to check out the other Bunny & Guinea digital stamps here!
  
Want them all? Then just bundle & save here !


Use coupon code NOELENE for 10% off your purchase!


Supplies:
Paper: Doodlebug Design - Hippity Hoppity Collection
Colouring Medium: Copics
Accessories: Pink Fresh Studio Stiched Scallop Rectangles Die, Doodlebug Design Shape Sprinkles.

For more inspiration, check out my Instagram!

Thanks for stopping by!

Hugs

Noelene :)